Here’s an exciting challenge I came across this week. Someone on the e-Learning Heroes forum tried to animate objects to shrink when they hovered over them and then grow back when they hovered out. Their goal was to use this type of animation to create a training module for healthcare to check pupils with a penlight.
The Mockup
I thought it would be more straightforward when I first looked at this challenge. Just create a few animations and triggers, and the problem is solved. Sometimes, that is not the case. To get the effect the user wanted, I had to do the following:
- Create an oval shape that used the shrink exit animation on a new layer
- Add a cue point to pause the timeline
- Add a hotspot to resume the timeline when the mouse hovered over it
- Add a second oval shape that used a grow animation
- Add a trigger to hide the layer when the timeline ended
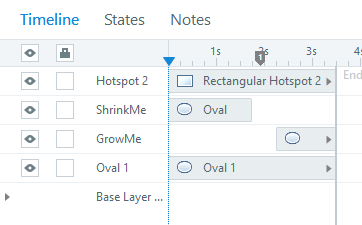
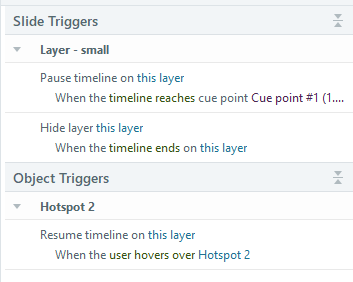
That’s a lot of programming to create a simple entry and exit animation, but that was the process I needed to follow to produce the results. You can see how I set up the timeline and triggers in the images below:

A Penlight and a Pupil
Now that I had a working example, I wanted to see what else I could do to make the interaction more engaging and realistic. If you recall from earlier, the user wanted to use this effect to show their learners how to use a penlight to check someone’s pupils.
- Found an image of a penlight
- Created a slider and added the penlight object to it
- Created a lightbeam using the trapezoid shape, added some gradiation stops
- Created states for the lightbeam that changed based on the location of the slider
- Added a black circle that was just a little larger than the person’s real pupil and gave it two states
Here are the final results where you can see both samples. In the end, I feel that the second sample was much easier to create (e.g., using the slider and state changes) and produced a more realistic look for this interactive. What do you think? Let me know in the comments!

Leave a Reply